Multi Image Upload using React Dropzone, Laravel and Amazon S3
Introduction
Having scoured the internet for a comprehensive guide on implementing a multi-image upload system using Laravel, React Dropzone, and Amazon S3, I found myself coming up short. Fueled by the need to bridge this gap, I’ve decided to create my own guide based on the requirements I encountered. It’s worth noting that I am relatively new to Laravel, having only used it a few times, and PHP is not my native programming language. So, expect some room for improvement.
Prerequisites
This guide assumes a basic understanding and setup:
- An active AWS account with an S3 bucket for storing images.
- An existing Laravel project (I’m using a Laravel Breeze starter kit with React).
- A model with a
jsonfield, cast as anarray, to store multiple image URLs.
Base Setup + Setting up Image Upload/Delete Endpoints
AWS Configuration in .env
Update the .env file with your AWS credentials and bucket information:
# .env

AWS_ACCESS_KEY_ID=your_access_key
AWS_SECRET_ACCESS_KEY=your_secret_key
AWS_DEFAULT_REGION=your_bucket_region
AWS_BUCKET=your_bucket_name
AWS_USE_PATH_STYLE_ENDPOINT=false
AWS_URL="https://{your_bucket_name}.s3.your_bucket_region.amazonaws.com/"
Create a ‘filesystem disk’ in config/filesystems.php:
// config/filesystems.php

'disks' => [
    // ...
    'property_images' => [
        'driver' => 's3',
        'key' => env('AWS_ACCESS_KEY_ID'),
        'secret' => env('AWS_SECRET_ACCESS_KEY'),
        'region' => env('AWS_DEFAULT_REGION'),
        'bucket' => env('AWS_BUCKET'),
        'url' => env('AWS_URL'),
        'endpoint' => env('AWS_ENDPOINT'),
        'use_path_style_endpoint' => env('AWS_USE_PATH_STYLE_ENDPOINT', false),
        'throw' => false,
        'visibility' => 'public',
        'root' => 'property-images',
    ],
],
Controller Methods
In your controller (PropertyController in my example), add methods for image upload and delete:
// PropertyController.php

public function image_upload(Request $request)
{
    $images = [];

    if ($files = $request->file('files')) {
        foreach ($files as $image) {
            $image_name = time() . rand(1, 100) . '.' . $image->extension();
            $image = Storage::disk('property_images')->putFileAs('', $image, $image_name);
            $images[] = Storage::disk('property_images')->url($image_name);
        }
    }

    return response()->json(["file_urls" => $images]);
}

public function image_delete(Request $request)
{
    $content = $request->all();
    $image_url = $content['image_url'];
    Storage::disk('property_images')->delete($image_url);

    return response()->json(["deleted_file_url" => $image_url]);
}
Routes
Set up routes for the created methods:
// routes/web.php

use App\Http\Controllers\PropertyController;

Route::post('/image-upload', [PropertyController::class, 'image_upload'])->name('image.store');
Route::post('/image-delete', [PropertyController::class, 'image_delete'])->name('image.delete');
Dropzone JS and the View Component
Install react-dropzone:
npm install --save react-dropzoneInclude Dropzone CSS in resources/views/app.blade.php:
<!-- resources/views/app.blade.php -->

<!-- CSS -->
<link rel="stylesheet" href="https://cdnjs.cloudflare.com/ajax/libs/dropzone/5.9.3/dropzone.css" integrity="sha512-7uSoC3grlnRktCWoO4LjHMjotq8gf9XDFQerPuaph+cqR7JC9XKGdvN+UwZMC14aAaBDItdRj3DcSDs4kMWUgg==" crossorigin="anonymous" referrerpolicy="no-referrer" />
Create a MyDropzone component:
// resources/js/Components/Dropzone.jsx
import React, { useCallback } from 'react';
import { IoMdCloseCircle } from 'react-icons/io';
import axios from 'axios';
import { useDropzone } from 'react-dropzone';
const MyDropzone = ({ images, setData }) => {
const onDrop = useCallback((acceptedFiles) => {
axios
.post(
'/image-upload',
{
files: acceptedFiles
},
{
headers: {
'Content-Type': 'multipart/form-data'
}
}
)
.then(({ data }) => {
setData('images', images.concat(data.file_urls));
})
.catch((error) => {
console.error(error);
});
});
const handleDeleteImage = (image) => {
axios
.post('/image-delete', {
image_url: image.split('/property-images/')[1]
})
.then(() => {
setData(
'images',
images.filter((img) => img !== image)
);
})
.catch((error) => {
console.error(error);
});
};
const { getRootProps, getInputProps, isDragActive } = useDropzone({
onDrop
});
return (
<div>
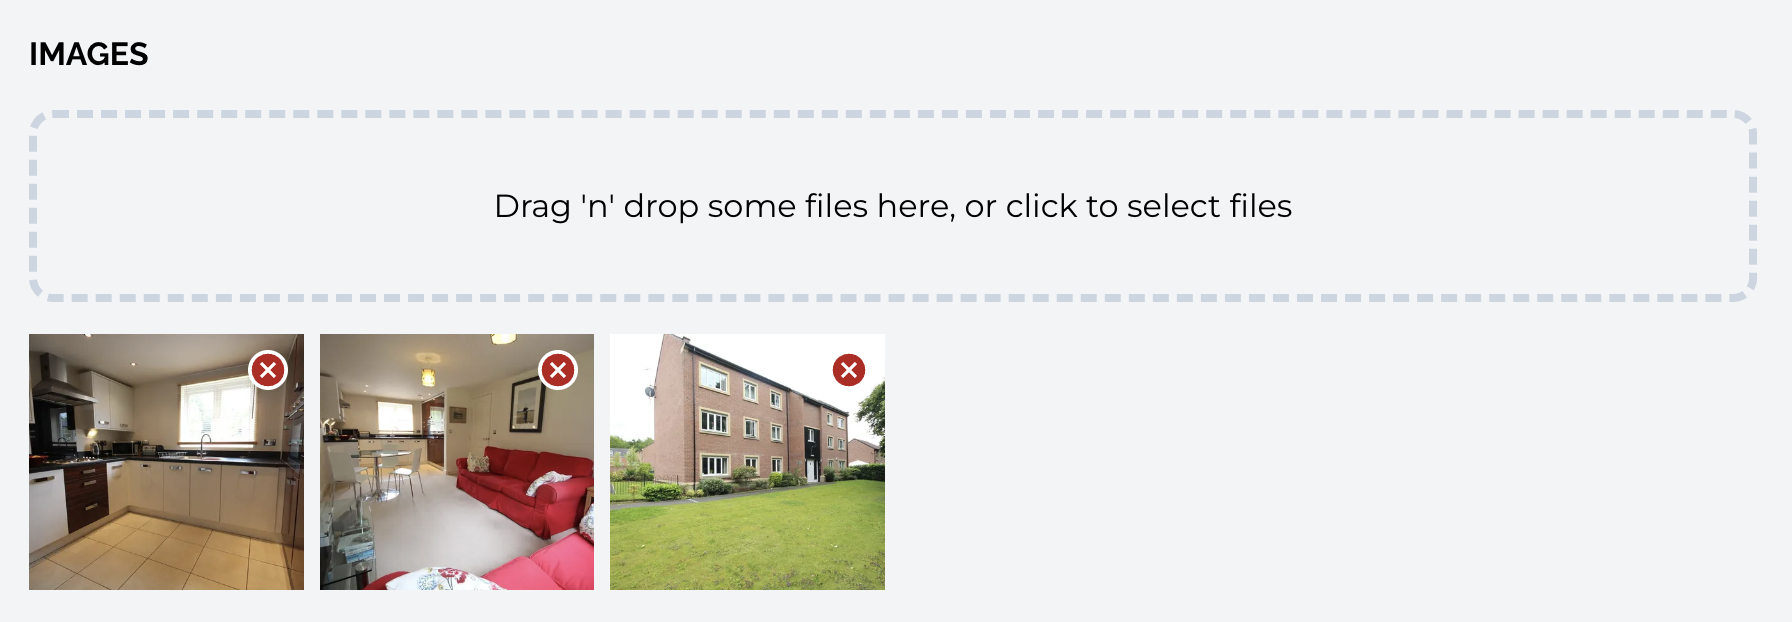
<div className="border-dashed border-4 border-slate-300 rounded-xl p-8 mb-4 flex justify-center font-montserrat hover:cursor-pointer" {...getRootProps()}>
<input {...getInputProps()} />
{isDragActive ? <p>Drop the files here ...</p> : <p>Drag 'n' drop some files here, or click to select files</p>}
</div>
<div className="grid grid-cols-3 md:grid-cols-6 gap-2">
{images?.map((image) => (
<div className="relative" key={image}>
<IoMdCloseCircle onClick={() => handleDeleteImage(image)} className="absolute top-2 right-2 bg-white rounded-full text-red-700 text-xl" />
<img className="object-cover h-32 w-full" src={image} alt="" />
</div>
))}
</div>
</div>
);
};
export default MyDropzone;Conclusion
In conclusion, this guide provides a comprehensive solution for implementing a multi-image upload system using React Dropzone, Laravel, and Amazon S3. By following these steps, you can seamlessly integrate image upload and deletion functionalities into your web application.
Next steps could include adding error handling mechanisms, enhancing the user interface, and implementing additional features such as a loading state during image uploads. Thank you for reading, and I hope this guide proves beneficial in your development journey.